Any and all advice, guides, and reviews are unbiased and based on my personal experience. If you buy through affiliate links, I may earn commissions, which helps support my website. This does not have an impact on posts or my opinion of any reviewed products. If you find this post helpful and want to say thanks, please buy me a coffee or take a look at my book on Amazon. It keeps this page ad-free. Thank you!
Epomaker has regular sales on Amazon, check them out here.
When I reviewed the Epomaker TH80 V2 Pro I wished Epomaker made a gaming mouse, well I found out they do… and I am now the proud owner of the Epomaker Click Mouse. This is a real user review of the Epomaker Click Mouse (not to be confused with the Epomaker Click Lite) and based on my personal gaming experience. I hope it’s helpful to others.
Before I begin, in the event Epomaker ever read my reviews, you need to come up with a better name than Click. It’s a bit of a generic name in a world where gaming mice have tough war-like names, it would be cooler if it was ClickStrike, or ClickFire or ClickShot… anything but just ‘Click’ but I digress! But I guess you don’t need a cool name to be a great gaming mouse, a rose by any other name and all that…
Epomaker Click Gaming Mouse First Impressions
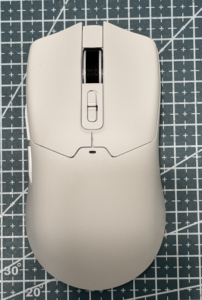 I got the Epomaker Click Gaming Mouse in white, to pair with my white TH80 Pro keyboard, to match to my white desk. The first thing you notice is how light the mouse is, mine weighed in at 59g, so close to the 58g (2oz) promised given the margin of error in my own scales.
The white Epomaker Click mouse is pure white, like arctic white. This may seem odd to call out, but a lot of white PC accessories are actually off-white, this is the first time I have had something live up to the all-white promise. Aside from Epomaker branding on the left edge, it’s a very clean design. This is a non-RGB mouse. There is some light color bleed around the buttons when you change the DPI (but to be fair, you need the light color bleed to know what DPI you set) and this turns off after a few seconds. So it’s not an issue.
Build wise, despite being super light, the Click mouse feels well solid. There is no flex, creeks, or rattles and the buttons have a quality click (this is why the ‘click’ is too generic Epomaker!). The scroll wheel has black rubber, and a satisfying notch feel as you scroll. You can’t fast spin the scroll wheel.
I’ll talk more about the buttons later, but there’s 7 buttons on the topside of the mouse, 2 of which (below the scroll wheel) are DPI controls, making for 5 user buttons, your usual left/right, the scroll wheel clicks, and there are 2 macro buttons – but I’ll talk more about the buttons later.
On the underside of the Epomaker Click mouse, there’s a physical switch for choosing between 2.4G, Bluetooth, or wired mode; a pairing button (for 2.4Ghz and pairing to up to 2x Bluetooth devices), and a button for adjusting the polling rate.
There are removable protector stickers on the mouse glide pads that you will need to remove for your first use.
In the Epomaker Click box you will find:
- Epomaker Click Mouse
- 2.4Ghz USB C receiver dongle
- braided USB A to USB C cable (about 1.5M/4ft), mine is white (matches the mouse)
- additional glide pads
- various stickers
- instruction guide
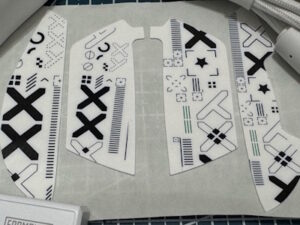 The stickers surprised me (see photo). I got two sets with my mouse, not sure if that is a deliberate or I was just lucky. The stickers are so you can decorate the left/right buttons and left/right side of the Click mouse. They’re thick cut vinyl stickers (I think they’re vinyl). To be honest, I’m not a fan of the sticker design so decided not to apply them. If you were so inclined, you could use the stickers as a template to make your own design to your own taste.
Epomaker Click Connectivity (2.4Ghz/Bluetooth/Wired)
The mouse is plug and play (2.4Ghz, Bluetooth, or wired) all you need to do is select the right position on the underside switch. You can pair up to 2 x Bluetooth devices at a time, and given you can also use 2.4Ghz, you can possibly pair this with up to 3 PCs at a time (I dual paired across my Gaming Desktop and my macOS laptop).
On first use, I used the 2.4Ghz first and the click mouse just worked. You need to use the USB A to USB C cable with the dongle, as it’s a high speed, high poll rate receiver. The receiver has a green light to signal connectivity. I do wish that the green light switched colors to reflect your DPI or polling rate…
 If you’re planning on using the Epomaker Click on a gaming laptop, you may not like this mouse. As a gaming mouse the Click has one of those larger 2.4Ghz receivers (see photo) so on a gaming laptop, it might not be convenient. I tried to see if I could get it to pair with one of the receivers in my Epomaker Keyboards (the smaller USB A type) but I couldn’t figure out a way to do it and I am guessing they’re using different tech on each… I’m planning on emailing Epomaker support to ask.
Epomaker Click Mouse Drivers
The Epomaker Click is plug and play, but there are drivers if you want to program macros on the side buttons. The Epomaker software is also needed for firmware updates (although I later found my firmware was already up to date out of the box). If you’re looking for the Epomaker Click Mouse Software Drivers, you can find them here. There are drivers available for Windows and macOS, but I am only using the software on my Windows Gaming Desktop.
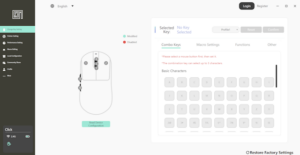 The Epomaker Windows Software has the generic name of “Epomaker Driver v4” even though the actual software version is 3.2.14 (c’mon, get creative with names Epomaker! I’m telling you Epomaker ClickShot would be a great name!). There’s a few good things to note about the Epomaker software doesn’t autostart by default. To turn this on, select More on the left and turn on “Start on boot” and also “Minimize to tray when closed, do not exit the program”. The icon for the Epomaker app is white with a transparent background, which can get lost in your tasktray.
I found some settings in the Epomaker mouse drivers that you don’t normally find in gaming mouse in this price range. In the “Performance Settings” section you get some advanced options to tune how the Click mouse behaves. Silent Height adjusts how far you can lift the mouse before the sensor stops tracking (great if you’re a widescreen gamer), with lower numbers giving tighter control. Move Correction lets you smooth out small hand movements if you want steadier lines. Sleep Settings handles battery use by deciding how quickly the mouse goes idle on 2.4GHz or Bluetooth. Debounce Delay changes how quickly clicks register, with lower values feeling faster and higher values helping avoid double‑click issues. Scroll Emulation adjusts how quickly the wheel input is read. All of this means the Click mouse lives up to the gaming promise and should more than satisfy even hardcore gamers.
For Macros, the Click mouse supports up to 8 profiles. You can program up to 3 characters as part of combo keys, macros can be recorded, record other functions e.g. Play, Adjust Screen Brightness, etc. there’s also an “Other’ option for rapid fire. Now if only I had a game that had unlimited ammo!
You can Register in the Click app which I didn’t do, as I tend to avoid registration as a rule. This lets you upload your saved macros to the Epomaker “Community Share” store. This is where you can share macros with other Epomaker users. It’s a nice idea, will be interesting to see if it gets traction and community support.
EpoMaker Click Gaming Mouse Gaming Experience
My go to PC game at the moment is Helldivers and the gaming experience of the Click mouse is great. High polling can make a difference, especially when you’re dodging, aiming, and firing in quick bursts. The mouse is comfortable (it’s symmetrical btw), even with a long gaming session, the height is good and the light weight makes a difference. I had no issue with 500mAh battery and the battery life has held up. Of course, you could use it as a wired gaming mouse but you’d then need to buy a cable for the dongle as I’d recommend using the supplied braided cable for gaming.
DPI, Polling Rate, Switches, and Acoustics
For an affordable quality gaming mouse, the Epomaker Click has lots of DPI and Polling options, some of which are more than anyone, but a true pro-gamer would need. DPI support ranges from 800 to an outrageously high 42.000! DPI can be adjusted on the fly using the top mounted buttons. Polling rate can go from 125 to 8,000, this is adjusted using a button on the underside and the sensor light underneath shows the color corresponding to polling rate. The user guide (and app) shows the colors that respond to each DPI/polling option, but you can also customize this in the app. My personal setting is high polling, but low range DPI – I can’t imagine anyone being able to play at 42,000 DPI.
Sensor wise, the Click uses a PAW3950 sensor, which is known for stable tracking, low jitter, and good lift‑off tuning and matches my own experience with the mouse. The switches are Omron D2LS Opticals, which are very good quality and found in higher end gaming mice (I think had a Razer mouse with these switches). What this means in real terms is both the sensor and switches are responsive, reliable, and the switches have good acoustics.
Final Thoughts and Verdict
The Epomaker Click Gaming Mouse is feature rich for the price, thanks to all the features you can unlock with the Epomaker drivers. I like the way it looks next to my Epomaker TH80 and overall it’s a great lightweight gaming mouse.
Hope this helps someone else!
Any and all advice, guides, and reviews are unbiased and based on my personal experience. If you buy through affiliate links, I may earn commissions, which helps support my website. This does not have an impact on posts or my opinion of any reviewed products. If you find this post helpful and want to say thanks, please buy me a coffee or take a look at my book on Amazon. It keeps this page ad-free. Thank you!